

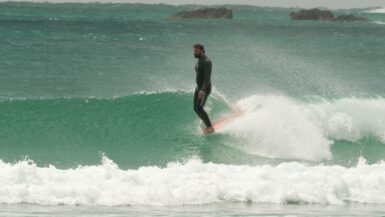
In water surf photography is one of the most difficult, but rewarding ways to capture the waves and can produce some incredible images.
But as well as being able to navigate the surf, pre-empt a surfers next move and hit the shutter at the right time you’ll need to make sure you have the right in water surf photography setup.
So if you’re looking at jumping in the water to capture some images, here’s a full breakdown of my surf photography setup – from cameras and lenses, to fins and head wear…
In Water Surf Photography – What Gear Do I Use? (+ Some Handy Tips!)
Contents
Cameras – 2022 UPDATE
When it comes to the best camera for surf photography there’s always going to be heaps of debate! If you’d asked me a few years ago I’d have said a solid Canon DSLR would be my choice.
However I’ve now made the swap over to Sony, and more significantly to a mirrorless system. Mirrorless cameras have come on leaps and bounds in the last few years, with all the specs you’d expect from an SLR – however most importantly they’re much more compact, lightweight and great value for money too.
When I got start I was using the Sony A6300 with a kit lens (more about that below) but I’ve made the big leap in upgrade (and pricing!) to the Sony A7IV, combined with the Sony 50mm F2.5 G Lens for in water shooting. Occasionally with the Sony 24-105mm G Lens as well, although the port on this one is a beast to swim with!
The Sony A7IV boats some impressive auto focus modes, up to 10FPS alongside 30MP still, and also 4K @ 60FPS, which was one of the main reasons for me upgrading.
For a lot of people (especially those just getting into thing) it might be a bit over kill – both in terms of specifications and pricing – but for those looking to up their game and have some serious gear at their disposal, the A7IV is an absolute joy to shoot with.
Lens wise the 50mm is my go to, although I do also mix it up with the 24mm F2.5 G Lens as well sometimes if I want to get a bit more involved in the action or for more punchy beach break shooting with its wider field of vision.
The 24-105 G Lens give a whole range of creativity in water and that huge range in focal lengths (with F4 throughout) will suit a whole range of shooting styles and will mean you have a solid lens for getting up close to the action or taking a more chilled seat on the shoulder, however the lens port and front element are pretty chunky for this setup, so I mainly use it on smaller days.
I’ve also added a URTH circular polarising filter for in water shooting too, which helps take out the glare and unwanted reflections. However, if I’m shooting in low light, or at sunset I’ll swap this out for the UV filter instead.
Budget Friendly Camera Option
If you’re looking for a more budget friendly setup, my original go to was the Sony A6300 with a 16-50mm lens, which is still a great option!
For photography it allows up to 8FPS, making it great for capturing all the action and when it comes to video it offers 1080 at 60FPS (for slow-mo sequences) or full 4K at 30FPS.
Sure I could’ve upgraded to one of the latest A6000 models – but the money I saved on opting for the A6300 also allowed me to grab a Sony 70-200mm zoom lens as well for land based shooting.
Alongside my Sony I also use the GoPro Hero 10 – which is a great value way to test out if surf photography is for you, but does come with a lot of limitations in terms of the lack of zoom. On my setup I’ll either mount it to the top of my housing (so I can simultaneously film and shoot) or I’ll use it for filming on some punchy beach break days.
Housing
 Buying the right camera housing can be a difficult one – their are a good selection of brands out there, but none of them are cheap, so it’s important to get it right.
I ended up going with the LiquidEye surf housing range
For my Sony A6300 the setup came in at just shy of AU$1400 – which included a lens port, pistol grip (a must for in water shooting) and a back plate with access to the full controls (which is a significant upgrade on many other brands).
The Sony A7IV housing was certainly a jump in total cost and sizing (as the camera and lens setup is significantly larger) but given my original LiquidEye housing didn’t let me down, it was a no brainer!
Made from a plastic composite they’re lightweight and super durable – perfect for taking on the road.
With a range of ports to suit all lenses and covering most Canon, Nikon and Sony cameras they’re my go to for surf housings.
You can also grab a mount for your GoPro to fit onto of the housing too – great for those wanting a backup i the lineup or capture video alongside your stills.
Check out my full Liquid Eye Surf Housing Review here
Fins
If you’re swimming out into the lineup to shoot, then a solid set of fins is another key part of your gear.
Having gone through a few options the DaFins range are by far the most comfortable and reliable setup – and they offer a big range of colours and style too, which is always a bonus!
Helmet/Hat
The final part of my in water surf photography setup is my hat/helmet.
 Now a lot of surf photographers wont both with either, but personally they’re a must, especially if you’re shooting in either crowded lineups, heavy waves or also, sunny conditions.
If it’s an easy shoot, with only a couple of people in the lineup and a sunny day I’ll just grab my Kaiola Surf hat to help with looking through the view finders and keep the sun off my head.
Use the code STOKEDFORTRAVEL for 10% off too!
However if I’m shooting in heavy conditions or at a crowded break like The Pass in Byron Bay (which is notorious for crowds!) then I wont swim out without a surf helmet.
There are a few brands to choose from but Gath Helmets are certainly the most widely regarded one, so that’s what I opted for. I’ve also added a sticker with my contact info on the back too, which helps people find me to buy their photos post session!
Grab Bag
Alongside all the above surf photography gear I also have a grab bag of extras that I’ll never head to the beach without. Small accessories and kit that will make your life easier and help make sure you hit the water prepared!
- Air blower – to easily remove dust and sand from your gear
- Dust brush – great to keeping things clean
- Allen key – to remove your camera from the housing
- Micro fibre cloth – again to help keep things clean but also to buffer your wax
- Candle stick – the secret weapon to keep water droplets off your lens (more info below!)
5 Surf Photography Tips You Need To Know
As well as getting the right gear hear are 5 simple tips to help take your surf photography to the next level
Wax Your Lens
Ummm…what?! Yup you read that right, wax your lens! Well actually not quite your lens, but your lens port! This is the secret sauce to keep water droplets from ruining your shots. rub a standard candle stick and buffer it in with a microfibre cloth. I usually apply about 3 coast just before hitting the water.
Best Camera Settings
When it comes to camera settings everyone has their favourite ways to shoot. But for me I manually set the shutter speed and F-stop, with the ISO on Auto. This allows you to control the depth of field and shutter, with the camera doing the work to get the correct exposure – which is super handy if you’re constantly panning around to different angles and peaks.
I push my shutter speed to at least 1/1000 (even more in bright conditions) to freeze the action, using the F-Stop to play with the depth of field to my desired taste.
Choose The Right Light
As with all photography – choosing the right lighting conditions is key. Some breaks are better lit in the afternoon than morning, so take that into consideration when planning a shoot.
Golden hour in the mornings and evenings will give you some epic lighting, but bright conditions will really brings out the blue in the ocean and give the colours plenty of pop.
Watch From The Beach
Before you jump into the water make sure you take the time to watch the lineup from the beach too. Remember you’re swimming – so you’ll need to be aware of hazards like rocks, rips and also surfers too. Don’t just swim out at a new spot because it’s pumping – get some practice in on smaller days so you can concentrate on your photography when it’s pumping!
Are you into in water surf photography?
What gear do you recommend?


Leave a reply